Gold and Diamond logo
Learn how to pimp your logo with diamonds and gold with this photoshop tutorial
Also take a look at other Photoshop tutorials...
Weathered stamp/flyer | Light in the Tower | Professional Changing of the eye color | All About Adjustment Layers | Understanding Curves |
Pages
Gold and Diamonds logo
This tutorial was made by Andrei Bilan and is used by t-tutorials thanks to his courtesy.
Please visit the original page as well,
http://andreibilan.blogspot.com/
I saw many people like the bling bling effect applied to text, but I will show you how to do the best gold and diamonds effect that you can apply to everything you want: your logo, your avatar, anything. For this Photoshop tutorial, we will have to use a new pattern. Just download this image right here
, open it in Photoshop then go to Edit > Define Pattern. Now we created a new pattern that we will use as a diamond.
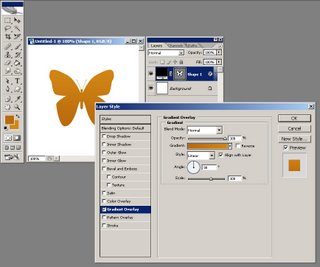
Create a new document, mine is 300x300 pixels. Set your foreground color to #bb6b0c and background color to #d28714 and draw the shape on which you want the bling bling effect to be applied. I'm using a butterfly shape from the shapes available under the Custom Shape Tool. Double click the shape layer you just created in order to see the Layer Styles and choose Gradient Overlay from the options available. Now from the Gradient picker choose the first gradient available (foreground to background), leaving the other options intact.

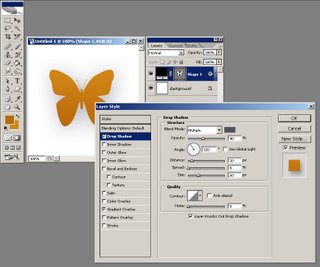
Apply the Drop shadow Effect with the opacity set to 40%, color set to #4b545d, Distance 10px, Spread 0px and size 60px.

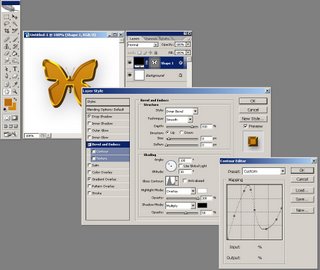
Now apply a Bevel and Emboss effect with the Style set to Inner Bevel, Depth 810%, Size 8px, Soften 0px; from the shading options set the Angle to 135 degrees, Altitude to 30 degrees, Highlight mode set to Overlay, color white and 100% opacity, Shadow mode set to multiply, color black and 60% opacity, and a Gloss Contour like you see I've drawn mine in the image below.

Pages
Submitted by Martin on 2006-09-24 14:52:58. Since then read 119754 times.
Scored 4.74 points out of maximum 5 by 27 votes.
Also take a look at other Photoshop tutorials...
Bevel and Emboss tutorial | Red Glass Button | Red tissue | Post-it-note | Colorizing a Grayscale image! |
Rate this tutorial!
Invite a friend!
Discussion
No contributions yet.
Be the first one to add one!

