Alien text
Easy and cool looking effect. Just like from the Alien film.
Also take a look at other Photoshop tutorials...
All about Layer Mask | Post-it-note | Dewy window | Light in the Tower | Comet or Shooting Star |
Alien text effect
Doing this text effect is very easy and basicaly involves only adding an Outher glow effect on the right type of text.
What we will do in the following few steps is that we make a writing in black, apply a specified outer glow effect with more settings in it and thats it ! It will look really nice and I ams usere that you will like it. Add a comment downthere.
1. Write your text in Black on the white background
(We used the alien font, you can download it from here.)
Really suitable font cos ti adds something of an atmosphere to the text. Though it is just text. Yet.
(We used the alien font, you can download it from here.)
Really suitable font cos ti adds something of an atmosphere to the text. Though it is just text. Yet.

2. Change colour of the background to Black as well (and see nothing for a while:)
The effect will look best on black backround, or if you plan to use it somewhere, the darker the background, the better look you get.
The effect will look best on black backround, or if you plan to use it somewhere, the darker the background, the better look you get.

As I mentioned before, the only thing involved in this effect is the Outer glow feature. To call the Layer style window, double click on the layer or use:
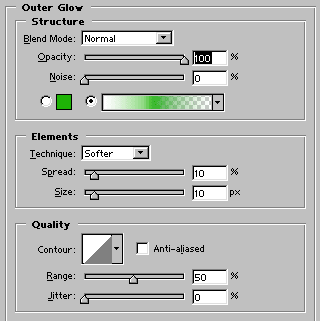
3. Layer/Layer style/Outer glow and use the settings as shown in the picture.
The thing is that we will not do the outer glow with a color, but with a gradient. So, click on the gradient and set it to something like mine. You can do that by clicking on the gradient and clicking on the lower left lever (what is the name for the thingy?) and change its color to white. Do the same with the green color on the right. Now, to the opacity, click on the right TOP lever :) and set opacity to ZERO. You can also work with the small square that shows itself after clicking on the lever and by this change the balance of the 2 colors/opacities.
The thing is that we will not do the outer glow with a color, but with a gradient. So, click on the gradient and set it to something like mine. You can do that by clicking on the gradient and clicking on the lower left lever (what is the name for the thingy?) and change its color to white. Do the same with the green color on the right. Now, to the opacity, click on the right TOP lever :) and set opacity to ZERO. You can also work with the small square that shows itself after clicking on the lever and by this change the balance of the 2 colors/opacities.

4. Apply the setting like in the picture above. So, you should have the effect by now, I hope you like it. It was really easy though good looking.
If you plan to use it somewhere, please try to save it in both GIF and JPG and compare which of them suits it better. I am sure you already know that GIF is used for large areas of one color and JPG for photos or pics with plenty of hues and gradients. Anyway, try both of them to obtain desired outcome.
If you plan to use it somewhere, please try to save it in both GIF and JPG and compare which of them suits it better. I am sure you already know that GIF is used for large areas of one color and JPG for photos or pics with plenty of hues and gradients. Anyway, try both of them to obtain desired outcome.

If you liked this tutorial (or even if you didnt :) please make a Comment and Vote in the section below.
Thank you.
And if you happen to have a good idea of a tutorial (that is REALLY yours), you might wish to send us the procedure in text form and/or pictures and we will place it on our site. Be proud of what you can do.
Enjoy.
Submitted by Martin on 2006-03-04 18:45:28. Since then read 77075 times.
Scored 3.91 points out of maximum 5 by 77 votes.
Also take a look at other Photoshop tutorials...
How to create a blueberry | Learn to use Quick Mask | Space flight simple | Post-it-note | Tattoo transplantation |
Rate this tutorial!
Invite a friend!
Discussion
Beren said on 2006-03-28 17:46:19I exected something more complicated but it looks as I expected. I like it.
Adam said on 2006-04-08 09:29:09
I liked this little idea...I created some pretty cool stuff with it...thanx
haavard haavard_29 AT hotmail DOT com said on 2006-04-18 13:31:36
U should write the color codes in the tut .... :P
Martin mato AT t-tutorials DOT com said on 2006-04-18 23:02:54
I deem the tutorial not that complicated. Anyway you are right, I am sorry I forgot. If you still demand the color, open the image in photoshop and take the color. But the effect works for almost any color so unleash imagination :D
storky said on 2006-05-10 03:33:28
i really like this....its easy but still looks amazing and u dont even have to rasterize the layer to do it so u can edit and add text with the effect engaged...
SHEKHAR shekhar_iyer81 AT yahoo DOT com said on 2006-08-08 18:24:53
Although, I tried my best.. I couldn't get that white kind of inner glow the picture shown here has. I mean Im only getting green glow. There are no traces of white glow as seen in this picture. This picture has a green outline at each of the alphabets, however the glow inside them is white colour. How do I get that effect? Do i ALSO NEED TO SET THE INNER GLOW? e-mail me anyone: with your exact settings on the gradient overlay as well as the outer glow. my e-mial id: shekhar_iyer81[at]yahoo[dot]com
Martin mato AT t-tutorials DOT com said on 2006-08-08 19:35:37
You asked whether you should use Outer Glow or Inner Glow, or both. Well, for this Alien tutorial I used only outer glow with the settings that are on a print-screen picture in the tutorial, this one: http://www.t-tutorials.com/data/Image/tutorials/Alien%20text/aleintext03.gif You just follow the settings in the screen shot and you ought to obtain the same outcome. If not, this might be due to the size of the text. So, either change the size of the text or use the option in Layer menu, and ther is an option to change size of the effects (I dont have PS here right now).
Calvin sk8ata4life AT hotmail DOT com said on 2006-11-19 23:51:21
UNless your a nooblet to photoshop do get the colour code for any colour is easy to find and for that its no differnt let me open photoshop and i'll post back with that colour code
Calvin sk8ata4life AT hotmail DOT com said on 2006-11-19 23:53:26
1EB306 is the code for that color alrighty :-) glad to help the noob photoshopers out there become just that much better by doing it myself :-)
Martin mato AT t-tutorials DOT com said on 2006-11-24 12:33:11
nice, as if it was thaaat difficult to get the color. but hey, your right, man. thx for doing it.
clarissa_f_1999@yahoo.com said on 2007-08-09 06:51:12
None of your windows on here is the same on my version. I have Photoshop Elements, do I just use the Neon glow filter or what?
etrdesign.tk etrdesign AT live DOT co DOT uk said on 2008-06-12 14:35:54
www.etrdesign.tk ---------------------- This is the best tutorial its simple and easy it even gives you a link of the text from the film Alien. Now i can make a t-shirt of alien!
Mario Chocooj mchocooj AT fs DOT fed DOT us said on 2011-07-11 22:39:28
Excellent tutorial! Effect will be used on non-commercial Invasive Species panels.
D-signer mchocooj AT fs DOT fed DOT us said on 2013-07-29 15:15:32
Thank you for sharing such great tutorial. As a graphic designer working for the Forest Service Region 5, I've applied your tutorial effect to three "Invasive Species" products. Please check it out at the Region 5 Flickr page: http://www.flickr.com/photos/usfsregion5/sets/72157627411980316/ Thank you again.

