All about Layer Mask
It is often used for preventing part of the layer from being seen. Worth seeing.
Also take a look at other Photoshop tutorials...
Add lightning to your photo | Retouch of panorama | Create a kite shield in Photoshop | Bevel and Emboss tutorial | Alien text |
Pages
Part III. - Usage in Adjustment Layers
I am sure you know what the adjustment layers are. Well at least many people know what they are for.
To briefly introduce them, open Image/Adjustments. You see all those function such as Curves or Hue Saturation? So, if you use any of them by this menu, they will affect JUST the layer you are currently at. So if you have an image with 50 layers, it might be problematic to use Curves on all layers by this procedure.
However, amost all functions that you saw in Image/Adjustments Image/Adjustments menu can be also made by Adjustment layers with two distinct advantages.
First: they will either affect all layers under them or just the one layer under them
Second: they can be edited easily because you can just doubleclick on them to call the function window again. They also have Layer Mask (that what interests us now) that can be used to state which area of the picture will be affected by the function and which wont.
OK, less words, to arms, lets do some practical example.
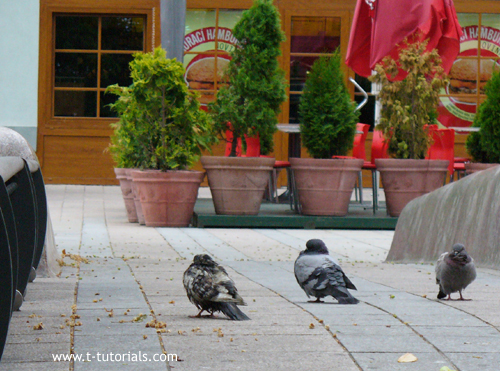
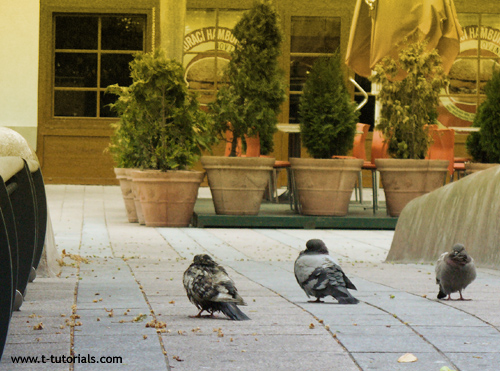
My testing picture:
(it is MY photo, isnt it nice? they were all sleepy, both city and pidgeons. AND, just after a second after I took the photo, one man with two of his sisters came from behind me, waking all the pidgeons up and completely spoiling magic of the moment.)
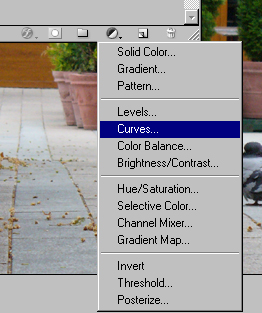
At the bottom of the Layers palette is this button for Adjustment layers, so choose Curves, will you?
Now we get the curves window, dont change anything, just click OK.
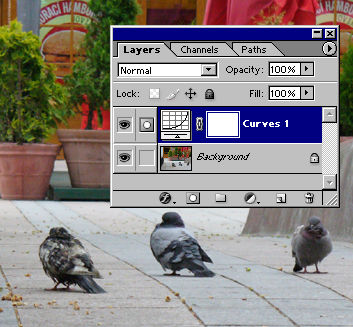
So, what I want to show you now is that also here can be used your knowledge of Layer masks.
Just draw something in the layer mask (click on the white rectangle on the right of the Curves layer, use Black and White colors).
When you have finished drawing, double click on the Curves icon on the layer to call the curves window and change the curves (e.g. lighten some parts).
If you have no idea what curves are or how they work, check our Understanding Curves tutorial.Click here.
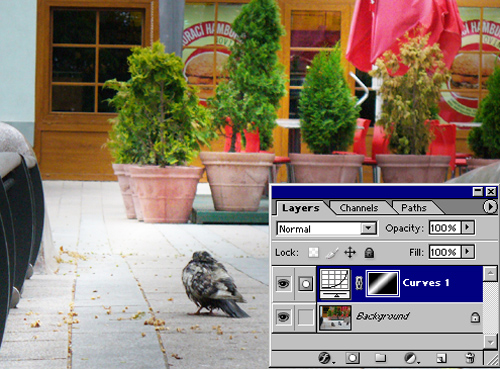
Or the other one. Delete the Curves layer and make the Hue Saturation one. In its Layer Mask make a vertical gradient. Double click on the left icon to change Hue Saturation. Use settings: Colorize, Hue 50, Saturation 67. Click OK.
Looks nice, doesnt it? If you happen to wish what would the picture look like if the Layer Mask wasnt working, just hold Shift and click on the Layer Mask. Red cross will appear on the Layer mask to show you it isnt working.
Thats all folks, I hope you enjoyed and learned something. I will make a tutorial on Adjustment Layers as such in due course.
Martin
Usage of Layer Mask can be seen in the following of our tutorials:
Colorizing Grayscale picture
Professional Eye color change
If you liked this tutorial (or even if you didnt :) please make a Comment and Vote in the section below.
Thank you.
Pages
Submitted by Martin on 2006-04-16 22:45:02. Since then read 138161 times.
Scored 4.21 points out of maximum 5 by 140 votes.
Also take a look at other Photoshop tutorials...
Crumbled old paper texture | Making sepia hue | Alien text | Professional Changing of the eye color | Retouch of panorama |
Rate this tutorial!
Invite a friend!
Discussion
Inu Inuyashatrigun2 AT yahoo DOT com said on 2006-05-02 20:17:11Why LM when you can just copy and past the grass over the ring, or erase the ring iteslf. Seems like more work you way.
Martin mato AT t-tutorials DOT com said on 2006-05-03 09:19:47
If you didnt notice, this tutorials is called ALL ABOUT LAYER MASK. I guess that is good reason for using LM instead anything else :D But I agree, and you can find it also in the tutorial, that there are plenty of options how to do one specific thing in Photoshop. So if you erase something or use layer mask, the result will be the same. Perhaps with only one difference; with eraser what you erase is GONE FOREVER but with Layer Mask, you can just discard the LM or fill it with white and you are there with the original object. Myriads of options.
kipster cj DOT cariola AT yahoo DOT com said on 2008-01-08 07:11:57
Really nice tutorial, very helpful! thanks!
Suruchi suruchi_suchi AT yahoo DOT co DOT in said on 2008-04-23 14:22:17
thnanks for this
xzcxzc zipzoner AT gmail DOT com said on 2008-08-11 22:45:33
very helpfull for beginner like me thx
K Stevens Krstevens AT weber DOT k12 DOT ut DOT us said on 2008-09-12 19:40:01
I am having trouble with my layer masks. I seem to be able to delete pixels when my foreground color is black, But sporadically I cannot resore pixels with white as the foreground. I would really appriciate any into you have. I have tried reading up on the subject and cannot find any trouble shooting info.
K Stevens Krstevens AT weber DOT k12 DOT ut DOT us said on 2008-09-12 19:45:37
I am having trouble with my layer masks. I seem to be able to delete pixels when my foreground color is black, But sporadically I cannot resore pixels with white as the foreground. I would really appriciate any into you have. I have tried reading up on the subject and cannot find any trouble shooting info.
George Machen gmachen AT triad DOT rr DOT com said on 2009-04-24 16:55:59
Is there a one-step way or command key to make a Quick Mask overlay on the main image out of its Layer Mask, and its edits go back to the Layer Mask? I'm trying to avoid the cumbersome steps of "Load Selection, Save Selection, etc., to accomplish that.
Simon datapeoplegraphics DOT marketing AT gmail DOT com said on 2011-03-02 09:27:57
Amazing,useful tutorial of layer mask Photoshop. datapeoplegraphics.com/layer-mask.html. I guess layer masks in Photoshop can be the important elements to generate multi-layered composite and versatile images. Layer Mask is more applicable when clipping path alone cannot work properly on complicated or complex images like hair mask, fur, semi translucent or transparent images. The main feature of Photoshop Layer masking is it is one of the most powerful Photoshop functionality and this can overlay over the top of each variety of pictures or images.Another point i think the layer mask operation is more easy then compare to quick mask option in Photoshop. Thanks.....For your tips of Layer mask Photoshop....Great !!
Danielle dasikins AT yahoo DOT com said on 2011-04-09 16:33:15
Great tutorial! I am learning photoshop on my own and this was a very well laid out step by step tutorial. Thanks for taking it by each piece and explaining the basics of each step. Keep up the good work!
Shumi transcriptionservices AT yahoo DOT com said on 2011-10-22 10:45:19
Very good tutorial.Well written and thanks for the detailed picture. http://transcriptionplace.com
Shumi clippingpath DOT specialists AT gmail DOT com said on 2011-10-22 10:46:24
Very good tutorial.Thanks http://www.clippingpathindia.com

