

Modern Art in Blue
Try to make this modern looking design.
Also take a look at other Photoshop tutorials...
Making abstract wallpaper | How to create a blueberry | Comet or Shooting Star | Professional Changing of the eye color | Light in the Tower |
Pages
< Previous Page 1 Page 2
4. Filter/Blur/Radial blur (20), once zoom, once spin
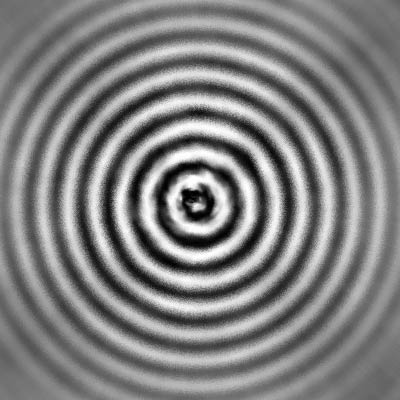
What we need now is some distortion. What I found very useful fo this effect in particulat is the following:
What we need now is some distortion. What I found very useful fo this effect in particulat is the following:
5. Filter/Distort/Wave, use everything like in the picture.
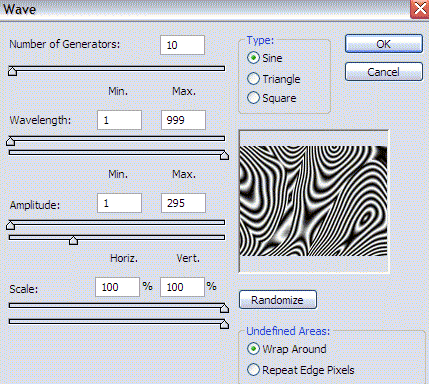
If you dont like the result, try and experiment with other settings, till you get satisfactory result. Play mainly with amplitude. After some experiments, this is what I got. You could possibly use Wave more times, but the edges will become significantly more visible, so work softly.
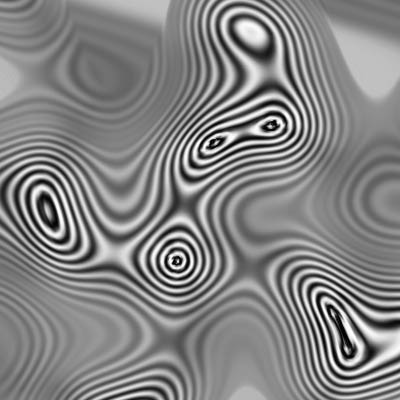
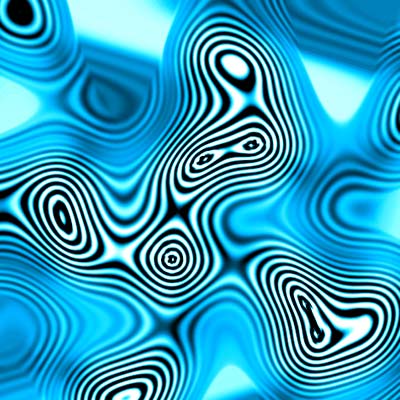
To give it a bluish color, use the following:
If you dont like the result, try and experiment with other settings, till you get satisfactory result. Play mainly with amplitude. After some experiments, this is what I got. You could possibly use Wave more times, but the edges will become significantly more visible, so work softly.
To give it a bluish color, use the following:
6. Image/Adjustments/Hue saturation, colorize, Hue 220, Saturation almost maximum
I really like what it looks like. What do you think about it? Leave a comment.
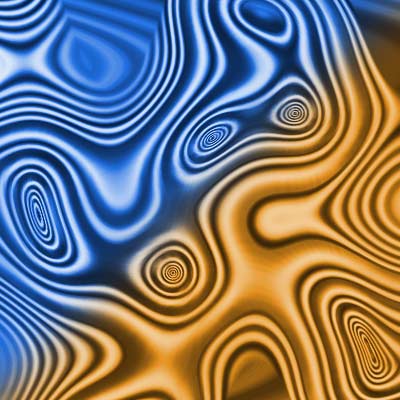
What i also did i that I changed a colors a bit to give it this wooden color. If I find some time, I will make an extra tutorial about this wooden thing.
Looks pretty nice, doesnt it? Put whatever you think in the Comments section below.
Hope you enjoyed.
And if you happen to have a good idea of a tutorial (that is REALLY yours), you might wish to send us the procedure in text form and/or pictures and we will place it on our site. Be proud of what you can do.
I really like what it looks like. What do you think about it? Leave a comment.
What i also did i that I changed a colors a bit to give it this wooden color. If I find some time, I will make an extra tutorial about this wooden thing.
Looks pretty nice, doesnt it? Put whatever you think in the Comments section below.
Hope you enjoyed.
If you liked this tutorial (or even if you didnt :) please make a Comment and Vote in the section below.
Thank you.
Pages
< Previous Page 1 Page 2
Submitted by Martin on 2006-03-28 15:57:45. Since then read 84786 times.
Scored 4.21 points out of maximum 5 by 39 votes.
Also take a look at other Photoshop tutorials...
Weathered stamp/flyer | Making abstract wallpaper | Create a kite shield in Photoshop | Post-it-note | Comet or Shooting Star |
Rate this tutorial!
Invite a friend!
Discussion
T said on 2006-06-08 16:29:37It's a nice tutorial. Only problem is that you missed something in step three. "3. Filter/Brush strokes (8, 5)" should be "3. Filter/Brush strokes/Spatter (Spray radius=8, smoothness=5) Had to figure that on my own... no fair making a newbie do some work! :)
Martin mato AT t-tutorials DOT com said on 2006-06-10 23:27:21
Sorry T, I have already changed it in the text. if you encounter any other things like this one, let me know. thx for making our tutorials better :D
SmokeJaguar evo_da AT hotmail DOT com said on 2007-12-29 22:21:54
Great tut lookin cool as my iPhone wallpaper-Thanks
lee said on 2010-01-11 18:10:10
its great!thnx